
Blog
How to sync your devices using a Raspberry Pi and Syncthing
2023-09-27Intended audience: If you are an advanced user, this article is not for you. Rather, it is more of a step-by-step walkthrough for novice to intermediate users. I don’t assume much beyond the ability to type commands into a terminal. I use a Raspberry Pi 4, but that’s not actually necessary, any computer will do.
In this post, I describe the setup I’ve been using for the past 5 years or so to share files between my devices. This solution allows you to create shared folders that remain in sync across devices. Importantly, this is NOT a full-fledged backup solution (although I will touch on that later on). Additionally, I’ve used this setup successfully to share folders on Linux (Fedora, Arch and Debian-based), Android and Windows. I haven’t used it with macOS, but I expect it would work there too.
In the unlikely event that you’re unfamiliar with the Raspberry Pi, it’s basically a low-power personal computer barely larger than a deck of playing cards. People use the Pi for all kinds of things like running small web servers, retro gaming, air quality monitoring and multimedia centers. You can find more info on the official website.
Syncthing, as their website states, “is a continuous file synchronization program. It synchronizes files between two or more computers in real time”. If you’ve ever used Dropbox, it’s the same idea: it creates a magic folder on your device that can be shared and synced with other devices. Any change you make to a within that folder will be automatically reflected in every device you’ve shared it with.
The great thing about Syncthing, as opposed to Dropbox, is that it’s free open source software (FOSS). Obviously, there’s a trade-off there. As is typically the case, the FOSS solution is not always quite as polished or easy to set up. In my experience, though, Syncthing is an excellent piece of software and I’ve had very few problems with it over the years.
So this is the basic idea: install Syncthing to all the devices you want to keep in sync and then choose folders to share between them.
There are many ways to arrange this network of devices, but what I’ve found to be the most effective is to have one “master” device that all your other devices sync to. This makes for an easy mental model to keep track of and it also makes it easy to add and remove devices in the future. This is where the Raspberry Pi comes in: as a small, silent, and unobtrusive device, the Pi is the perfect candidate for the role of “master”.
Installing Syncthing on the Raspberry Pi
n.b., I run my own Pi “headless”, i.e. without a screen and keyboard/mouse. If you run your Pi with a desktop environment, you can skip the ssh stuff and just run the commands in a terminal.
The following assumes you’ve installed Raspberry Pi OS with SSH enabled (see the first note in the “Enabling the server” section).
I also want to add that if you plan on syncing a lot of data (e.g. >10-20GB), you should consider setting up your Pi to auto-mount a USB hard drive and set up your shared folder there rather than on the standard SD card. There are two reasons for this, one is that SD cards rarely exceed 64GB and they tend to get quite expensive. The other is that SD cards tend to wear out faster when experiencing frequent writes.
Now ssh into your Pi from another computer on the same network:
ssh pi@<your Pi's local IP address>
The default password is “raspberry”.
From here, make sure you’ve updated everything:
sudo apt update && sudo full-upgrade
Next, follow the instructions found here to install Syncthing. As of writing, these are:
# Add the release PGP keys: (you may need to install `curl`)
sudo curl -o /usr/share/keyrings/syncthing-archive-keyring.gpg https://syncthing.net/release-key.gpg
# Add the "stable" channel to your APT sources:
echo "deb [signed-by=/usr/share/keyrings/syncthing-archive-keyring.gpg] https://apt.syncthing.net/ syncthing stable" | sudo tee /etc/apt/sources.list.d/syncthing.list
# Update and install syncthing:
sudo apt update
sudo apt install syncthing
Now, enable/start the associated systemd service. This will ensure Syncthing runs at startup.
systemctl enable syncthing@pi.service
systemctl start syncthing@pi.service
The next step isn’t strictly necessary, but I think it’s good practice. This will install UFW (Uncomplicated Firewall) and ensure the ports for SSH and the Syncthing web interface (more on that later) remain open and accessible.
sudo apt install ufw
systemctl enable ufw # IMPORTANT!! don't start the service just yet! you could end up accidentally locking the SSH port (22)
sudo ufw allow syncthing
sudo ufw allow syncthing-gui
sudo ufw allow ssh
systemctl start ufw
The web interface
You can now close your SSH session. If everything went well you can navigate to “http://<your Pi’s IP address>:8384” and you should be greeted with something like this:
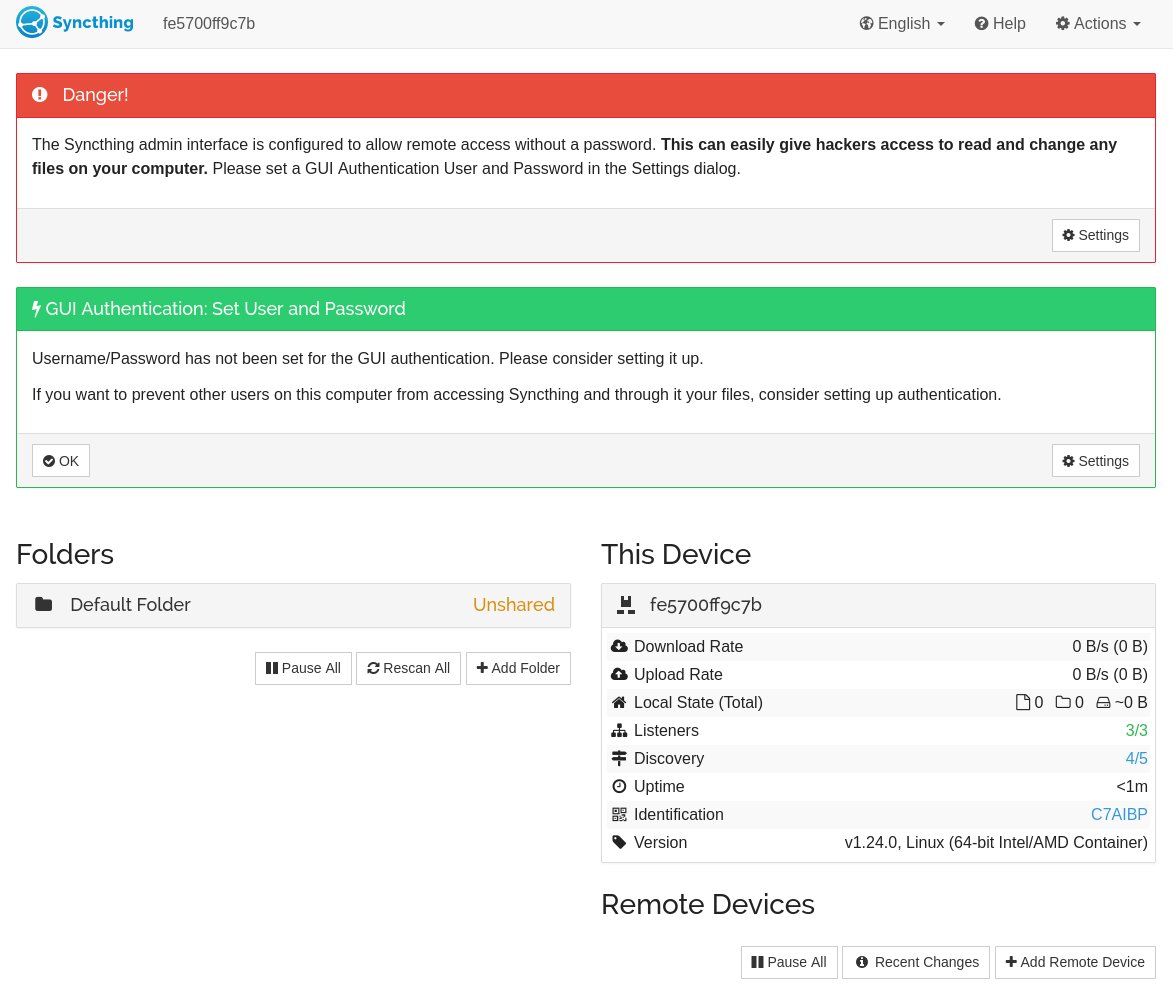
Follow the warning messages and set up a username and password if you wish.
By default, Syncthing will broadcast itself on the internet using a global discovery server. This can be useful if you want to keep things in sync when you are away from home, but if all you want is to have a home network, I recommend you disable that feature. In the settings menu, go to the connections tab and uncheck “Global discovery”.
Sharing settings
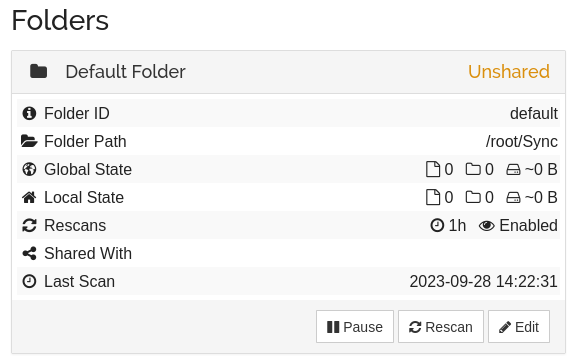
The next thing you will want to look at is the “Default Folder” that Syncthing has created. Click on it in the main menu, and then click on “Edit”.
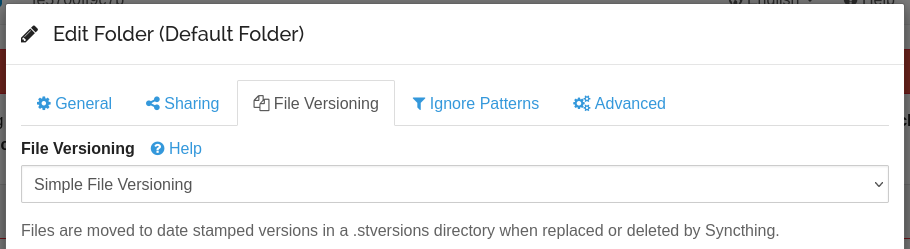
From here I recommend you activate file versioning, this will allow you to recover old versions of files in case you accidentally delete or overwrite a file. You don’t have to do this on every device, but doing it here is a good idea. “Simple File Versioning” with the default settings is a good choice.
The rest of settings can stay on their defaults.
Setting up your other devices
Installing Syncthing is pretty trivial on most other platforms. Take a look at their excellent website for guidance./
Regardless of your platform, the process of introducing new devices to your network should be the same: once Syncthing is running on a device, and assuming that device has access to the same network as your Pi, open the web interface for your Pi and your device side-by-side (i.e. localhost:8384 and
While it’s possible to have every device connect with every other device, I’ve found that that adds a lot of needless complexity. As I mentioned at the start, I’ve found it best to only connect each device to the Pi.
Wrapping up
Apart from the obvious benefit of sharing documents and pictures across devices, one of the best uses I’ve found for my setup is for storing my password database. I’ve been using Keepass as a password manager for many years. It’s a great piece of free software, but it lacks the cloud syncing of passwords offered by paid services like Bitwarden or 1Password. I used to use Google Drive to store and share my password database, but Drive is not well integrated into Linux, at least it wasn’t last I checked. Now, with Syncthing on the Pi, I just put the password database file in my shared folder and it’s instantly available on all my devices. And on the rare occasions when I accidentally overwrote a password, I was able to retrieve old versions of the file with ease.
When it comes to development, it’s also very practical to have synced folders without needing to set up a GitHub repo or another cloud solution for small projects or one-off files that I want to work on from different machines.
A word of warning: Syncthing is NOT a proper backup solution. As stated on their website, “Syncthing is not a great backup application because all changes to your files (modifications, deletions, etc.) will be propagated to all your devices. You can enable versioning, but we encourage you to use other tools to keep your data safe from your (or our) mistakes.” That being said serving as a network attached storage (NAS) solution is an excellent usecase for the Pi and I do so myself, but that’s a story for another time.
I hope this article has been useful for you!
Writing a Text Editor in Rust - Part 1
2023-09-02n.b.: all the code for this project can be found here
I’ve been teaching myself Rust for some months now, but I’ve yet to apply what I’ve learned to anything “big”. I think writing a text editor in Rust could be a good way both to put my new skills to the test, as well as broaden my knowledge.
I’ll keep things “simple”: a basic command line text editor that can edit one file at a time.
Requirements
- Read and display a single file as text
- Allow the user to edit the text. Which means the ability to…
- write and erase characters
- select sequential characters
- cut, copy & paste characters to and from the system clipboard
- undo/redo changes
- scroll up & down
- Write changes to a file or save a new file to disk
Application design
At a minimum, our project will need to have the following modules in order to meet the requirements:
- Some kind of text buffer
- Some way of describing the edits that can be applied to the text buffer
- A stack of edits for undo history
- A terminal user interface to display text and capture keystrokes
- Cursor and Selection objects
- An IO module to interface with the file system and clipboard
Part of this will comprise the “core” or “backend” of the application, and will be responsible for storing and manipulating the actual data in memory (i.e. the text buffer and undo stack) as well as reading and writing to disk. What the user actually interacts with will be the “frontend”: in this case a terminal user interface that will be responsible for displaying the text returned by the backend, displaying the cursor/selection and converting keystrokes to edits that will be sent to the backend.
In terms of API, this means that the core of the application has no notion of displaying text, it only cares about text data and text edits. And the frontend doesn’t care how the text data is actually stored and mutated, all it’s concerned with is displaying some text and handling keystrokes.
Having a modular design like this should help keep the codebase clean and maintainable and should make it easier to add new features in the future. Like adding a graphical frontend, for example.
The application flow will look something like this:
- The user starts the application passing in a path to a file they wish to edit
- The app reads the file into memory and passes it to the backend which converts the data to some kind of text buffer
- The app initializes the frontend within a loop construct
- The frontend requests text to display from the backend which returns a representation of the text buffer
- The frontend parses this representation and writes/draws to stdout
- The app now waits for user input (keystrokes)
- The user moves the cursor and selects some text they wish to delete
- The frontend sends an edit to the backend that says something like “delete the characters from index 42 to index 53”
- The backend responds with the new text with the selected characters removed
- The changes are reflected in the UI
Laying the Foundations
OK! Let’s get started.
cargo new edythe
I’m calling it edythe; it was my grandmother’s name, and it sounds a bit like “edit”.
I’d like to get something I can play with as soon as possible so let’s start by getting our app to display the contents of a file.
I’m using clap to parse the command line arguments. I’ll be using some convenience libraries where it makes sense, but I’ll try to stick to the standard library for the core application code; mostly as an excuse to familiarize myself with it more.
// main.rs

use std::path::PathBuf;

use clap::Parser;

// Define the command line arguments
#[derive(Parser)]
struct Args {
    #[arg()]
    file: Option<PathBuf>,
}

fn main() {
    let args = Args::parse();

    if let Some(file_path) = args.file {
        // Read file content and display it
        let content = std::fs::read_to_string(file_path).unwrap();
        println!("{}", content);
    }
}
We can now run cargo run --quiet src/main.rs and our program will print itself! But it’s just static text; it gets dumped to stdout and the process immediately exits. In order to make it editable, we need to do a couple things.
println!won’t be enough. We need to have some way to “draw” to the terminal.- This is actually complex enough that it warrants reaching for another crate. We’ll use
crosstermbecause it’s popular, well documented and tested on numerous terminal emulators.
- This is actually complex enough that it warrants reaching for another crate. We’ll use
- We don’t want the program to exit right away. We need to implement a looping construct where we listen for keystrokes and go through the steps outlined above.
crosstermhas anEventmodule which will be perfect for this.
- The content of the file should be stored somewhere so that we can edit it.
- We’ll just use
Stringfor now and think about more sophisticated solutions later.
- We’ll just use
I’ll also implement some structs to organize the code: Buffer to hold the actual text data and methods to modify it; Editor as an abstraction layer of the buffer; Tui to take handle events and writing to screen.
// main.rs

use std::fs::File;
use std::io::{BufWriter, Stdout, Write};
use std::path::PathBuf;

use clap::Parser;
use crossterm::{cursor, queue};
use crossterm::{
    event::{self, Event, KeyCode, KeyEvent, KeyModifiers},
    execute,
    style::Print,
    terminal,
};

#[derive(Debug)]
enum BufferPath {
    File(PathBuf),
    Temp(usize),
}

struct Buffer {
    path: BufferPath,
    data: String,
}
impl Buffer {
    fn new(path: BufferPath, data: String) -> Self {
        Self { path, data }
    }

    fn append_char(&mut self, c: char) {
        self.data.push(c);
    }

    fn delete_char_from_end(&mut self) {
        if !self.data.is_empty() {
            self.data.pop();
        }
    }
}

struct Editor {
    buffer: Buffer,
}
impl Editor {
    fn new(buffer: Buffer) -> Editor {
        Editor { buffer }
    }

    fn save_to_disk(&self) -> std::io::Result<()> {
        if let BufferPath::File(ref file_path) = self.buffer.path {
            let mut f = BufWriter::new(File::create(file_path)?);
            f.write(self.buffer.data.as_bytes())?;
        }

        Ok(())
    }

    fn insert_char(&mut self, c: char) {
        self.buffer.append_char(c);
    }

    fn delete_last_char(&mut self) {
        self.buffer.delete_char_from_end();
    }
}

#[derive(Debug)]
enum EditorEvent {
    Edited,
    Quit,
    Continue,
}

struct Tui {
    out: Stdout,
    editor: Editor,
}

impl Tui {
    fn new(editor: Editor) -> Self {
        Self {
            // Crossterm is can write to any buffer that is `Write`, in our case, that's just stdout
            out: std::io::stdout(),
            editor,
        }
    }

    fn run(&mut self) {
        // The "alternate screen" is like another window or tab that you can draw to. When it's closed
        // the user is returned to the regular shell prompt. This is how "full-screen" terminal apps
        // like vim or htop do it.
        execute!(&self.out, terminal::EnterAlternateScreen).unwrap();

        // By default the terminal acts sort of like the default text input of the shell. By enabling
        // "raw mode" crossterm gives us full control of what and how stuff gets displayed.
        terminal::enable_raw_mode().unwrap();

        // first draw
        self.draw();
        // This is the main loop our app runs in.
        loop {
            match self.read_input() {
                EditorEvent::Continue => continue,
                EditorEvent::Quit => break,
                EditorEvent::Edited => {
                    self.draw();
                }
            };
        }

        terminal::disable_raw_mode().unwrap();
        execute!(&self.out, terminal::LeaveAlternateScreen).unwrap();
    }

    fn draw(&mut self) {
        queue!(
            &mut self.out,
            terminal::Clear(terminal::ClearType::All),
            cursor::MoveTo(0, 0),
            Print(&self.editor.buffer.data)
        )
        .unwrap();
    }

    fn read_input(&mut self) -> EditorEvent {
        match event::read().unwrap() {
            Event::Key(key_event) => self.match_keyevent(key_event),
            Event::Resize(_, _) => EditorEvent::Continue, // TODO
            Event::Mouse(_) => EditorEvent::Continue,     // TODO
            _ => EditorEvent::Continue,
        }
    }

    fn match_keyevent(&mut self, key_event: KeyEvent) -> EditorEvent {
        match key_event {
            KeyEvent {
                code: KeyCode::Char('c'),
                modifiers: KeyModifiers::CONTROL,
                ..
            } => return EditorEvent::Quit,
            KeyEvent {
                code: KeyCode::Char('s'),
                modifiers: KeyModifiers::CONTROL,
                ..
            } => self
                .editor
                .save_to_disk()
                .expect("I couldn't save the file for some reason."),
            KeyEvent {
                code: KeyCode::Backspace,
                ..
            } => self.editor.delete_last_char(),
            KeyEvent {
                code: KeyCode::Char(c),
                ..
            } => self.editor.insert_char(c),
            _ => return EditorEvent::Continue,
        }

        EditorEvent::Edited
    }
}

// Define the command line arguments
#[derive(Parser)]
struct Args {
    #[arg()]
    file: Option<PathBuf>,
}

fn main() {
    let args = Args::parse();

    let buffer = match args.file {
        Some(path) => {
            // read file content into buffer; or empty string if the file doesn't exist
            let data = std::fs::read_to_string(&path).unwrap_or_default();

            Buffer::new(BufferPath::File(path), data)
        }
        None => Buffer {
            path: BufferPath::Temp(0),
            data: String::new(),
        },
    };

    let editor = Editor::new(buffer);

    let mut tui = Tui::new(editor);

    tui.run();
}
This works reasonably well as a naive implementation. A first thing I noticed though is that newlines are not causing the cursor to return to the beginning of the next line. So files end up looking like this:

This is an easy fix, we just need to update the draw function to get the cursor to reset to the first column for each new line.
// main.rs

fn draw(&mut self) {
        queue!(
            &mut self.out,
            terminal::Clear(terminal::ClearType::All),
            cursor::MoveTo(0, 0),
        )
        .unwrap();

        let mut lines = self.editor.buffer.data.lines();

        // print the first line
        queue!(&mut self.out, Print(lines.next().unwrap_or(""))).unwrap();

        // reset the cursor before each subsequent line
        for line in lines {
            queue!(&self.out, cursor::MoveToNextLine(1), Print(line),).unwrap();
        }

        self.out.flush().unwrap();
    }
OK, cool! Now I can open files and they show up OK, but editing is still rather limited as the following recording shows.
I can type in some text, but I can’t add any new lines. I also can’t scroll up or down if the text is higher than the window. The last line seems to show the current cursor position and adding or removing text leads to unexpected behavior.
But it’s a start! I’ll tackle these problems and more in part two…
Planning "Sources"
2022-04-03About two years ago I was studying the history of the Soviet Union and came upon a re-examination, in light of recently uncovered evidence, of the WWII Katyn massacre. The universally accepted narrative has been that the Soviets were responsible for the atrocity; the new evidence however, according to the author, cast doubt on that conclusion.
As I was going through the author’s arguments, comparing them to those of the accepted narrative, I had a bit of an epiphany. I thought: “wouldn’t it be nice if there was a way to measure the truth-value of these claims in a transparent way?” I imagined a sort of network in which claims could be connected to evidence via arguments. This network would be user-driven and all measures of a claim or a conclusion’s truth-value would be the result of public discourse and debate. Going one step higher, I envisioned sets of socially-determined “truth paradigms” which would in turn be sets of “truth criteria” setting the bounds for what is considered valid knowledge within that paradigm. For example, one truth paradigm could be called “scientific” and another “religious”. Both paradigms have their own definitions of what is required or sufficient to establish a measure of truth-value and content can be examined from both vantage points.
Going back to the Katyn massacre example, such a tool would alow us to examine the claims made about it and to trace the web of connections between those claims and the evidence that support them. By evaluating the quality of the evidence and the strength of said connections in terms of logical coherence; it should be possible to tease out a measure of the overall truth-value of the various interpretations of the historical event. It may not be enough to allow us to conclude whether the Soviets or the Nazis are responsible, but it may guide us towards which version is most likely. I should stress that all of this would be socially determined. ie. each piece of the puzzle is up for debate, similar to how the content of Wikipedia articles are debated in the “Discussion” tab but much more structured and explicit.
Going beyond a single historical event, I picture a potentially universally usefool tool that could be applied to any area of knowledge from quantum physics to astrological divination. It would be a sort of Wikipedia in which the claims made about a subjet would be rated in terms of their trustworthiness. If viewed through the lens of the scientific paradigm, I would expect the claims found on the quantum physics page to be rated as very trustworthy, whereas those found on the astology page would be basically worthless. These ratings might look very different if looked at from the perspective of another, more esoteric, truth paradigm.
The broad strokes of this idea have been bouncing around in the back of my head ever since it germinated there, but I have yet to set down the foundations needed to actually make the vision a reality. I’m not a philosopher, and I don’t know much about epistemology. For all I know, there may be a giant flaw in my idea which makes it unfeasible. I think part of the reason I haven’t built anything yet is that I have the feeling that this will be a massive undertaking and I’m just not sure where to start. I’m not the type of person to take notes or make mind-maps, but I’m tempted to do so for this project.
I’ve tentatively called this project “Sources” and opened up a repo to house the code and a kanban style project page as a sort of roadmap. I think my next step should be to actually sit down and map out exactly what the various minimal elements are required to make a proof-of-concept. Once I have that nailed down, I think I could make some application design decisions and get started on a prototype.
Stay tuned for more :)